STEM Starts in the Kitchen
Helping in the kitchen can allow children to practice fine motor skills, critical thinking skills, and even reading skills, but something that is not always seen is that cooking might be their first introduction to STEM.

For many, pulling up a chair to see over the kitchen counter to help an adult in their home prepare a meal is an important part of their developmental process. Helping in the kitchen can allow children to practice fine motor skills, critical thinking skills, and even reading skills, but something that is not always seen is that cooking might be their first introduction to STEM.
Food science at the professional level is obviously a popular STEM career field. From the chemists that work to develop new flavors to the technicians that work in food production plants, science is at the root of all aspects of food…but all the same STEM principles are present in the cooking done in the home. This clear connection between STEM and the kitchen can provide the perfect backdrop for introducing youth to the engineering design process in a familiar yet engaging way!
The Engineering Design Process is a six-stage cycle that engineers, and many other STEM professionals, use to solve problems and innovate in their professional careers work. It is also used in many schools and possibly even in the curriculum used in after-school/out-of-school learning programs. This process can be quickly introduced to students through a fun food science-related activity that can foster buy-in through the youth’s pre-existing interest or experience with cooking and food science. Here is a deep dive into how you can apply the engineering design process to a food science lab for younger students:
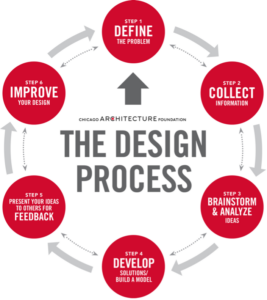
Step 1- Define the Problem
Two ways this can be done are by presenting the youth with a problem that already exists, like food allergies or food spoilage and waste, or opening the space up for them to think of problems they have seen related to food in their communities or schools. The goal of this is to have students look at food as something more than just what they eat but as a big picture and course of study.
Step 2-Collect Information
Have students do a deep dive into the issue. Give them some time to interview people who have experience living with food allergies or help them find resources online or at a library that has more information on the project. The goal is to provide the youth with a foundation of what is being done and why it matters so when they move to the next steps, they have some information to draw from.
Step 3-Brainstorm & Analyze Ideas
This is an opportunity for youth to look at what could be done about the problem they have selected and researched and apply their creativity and unique perspective to look for innovative solutions to the problem. It is important during this phase to support and encourage the youth to be as creative as possible and empower them to know that all ideas are good ideas while brainstorming. The goal of brainstorming and analyzing is to ultimately give them the ability to have an idea to build on in the next steps that could serve as a solution to the problem they are facing.
Step 4-Develop Solutions/Build a Model
Developing the solution is where the fun really starts in my opinion. This is where youth are able to make their food product that elements eliminate an allergen or show how they are packaging/storing food in an allergy-friendly way. This might be one of the longer steps of the process since some food items or other creations might take time to prototype. The goal of developing the solution is to help youth have hands-on experience with solving the issue they have been looking into during the design process.
Step 5-Present your Idea for Feedback
Even though the whole group has been looking into helping individuals with food allergies, they likely all took on different solutions to the problem, so it is important to have them present what they were working on to the group so they can see what others have done and get feedback from their peers and program providers. The goal of this is to have students practice talking about their solution and get an idea of some improvements and next steps they can take.
Step 6-Improve your Design
Even if their first solution solved the problem they were facing, it is important to help the youth learn how to take a deeper look and try to make their solution even better! The goal of this is to have them re-enter the design process at step 4 and continue to engage in this cycle until they have really polished their designs.
Seeing how the Engineering Design Process can be used through food science experiments is a strong reminder that for a lot of youth, STEM starts in the kitchen. So how can you integrate the design process and other STEM methods and practices into your everyday experiences with the youth?
Meet the Author

William Wilton is a fourth-year Family and Consumer Sciences Education Major with minors in Leadership and Communication, International Studies, and Textiles Design at the University of Nebraska-Lincoln. William wants to help youth grow and learn through adolescence and help prepare them for success later in life. He has held various internships with Nebraska 4-H across the state for the last two years and is now serving as a Positive Youth Development Intern at the State 4-H Office. He is originally from Gresham, Nebraska where he grew up participating in York County 4-H.
Resources
Link for picture: https://www.architecture.org/news/innovation-in-architecture/design-thinking-and-caf/
How to Become a Food Scientist and Why: https://www.usnews.com/education/best-graduate-schools/articles/what-food-science-is-and-how-to-become-a-food-scientist
Design thinking and CAC: https://www.architecture.org/news/innovation-in-architecture/design-thinking-and-caf/